Introduction
Broadband routers are the easiest way for you to build your own network. Using them, you can automatically share your broadband Internet connection among all computers on your network, as well as files and printers. Since they also work as a hardware firewall, it is also the safest way to be connected to the Internet nowadays. The installation is really fast and you can literally build your own network in just a few minutes. In this tutorial we will show you how to build your own network using a broadband router.
Figure 1: A typical broadband router.
So, what is a broadband router? Despite its name, it is a device that integrates several other features:
Broadband router: Automatically shares your broadband Internet connection among all computers connected to it. You also can configure it to limit Internet access based on several criteria (for example, time of the day – you may want your employees to be able to access the Internet only during lunch time or after job, for example).
- Hardware firewall: Prevents several kinds of attacks to your computer and also prevents shared folders and printers on your local network from being accessed by computers located outside your home or office.
- Switch: Almost all broadband routers also integrates a switch (usually a 4-port switch), allowing you to connect the computers you want to connect to the network directly on the router. You can also expand the number of ports by installing an external switch to the router. So for a small network with up to four computers you won’t need any extra hardware to build your network.
- DHCP server: This feature centers all network configuration options on the router, so you don’t need to do any kind of configuration (you should set them up as “automatic configuration”) on the client computers. Simply put, this allows you to simply connect any computer to the router and it will have immediate access to the Internet and to shared folders and printers located on your network, without needing any kind of configuration. Just plug and play!
- Wireless: The most recent broadband routers have wireless option, allowing you to connect computers without using cables. However, they will need a wireless network card and installing a wireless card to each computer on your network can be expensive. But this is a terrific solution for your home or small office where you have one or two laptops with wireless capability; just turn them on and you will be online. However, there are several security risks and fancy configuration options for using the wireless option safely. Read Basic Security in Wireless Networks to learn more. Read How to Build a Wireless Network Using a Broadband Router if you want to build a wireless network.
- Print server: Some routers provide a parallel port or an USB port for you to connect your printer directly on the router. This is really neat, because any computer on your network can use the printer without any fancy configuration. If you need to share your printer among all computers and you don’t buy a router with this option, the computer where your printer is attached to will need to be turned on in order to print something. This can be a hassle, for example, if the printer is connected to a computer from someone that is not in the office, it is turned off and he (or she) put a password on it. Also, by using a broadband router with print server option you can save some money on your electricity bill, since you won’t need another computer turned on to use the printer. If you choose to buy a router with this feature, you need to buy one with the same connection type as your printer, parallel or USB.
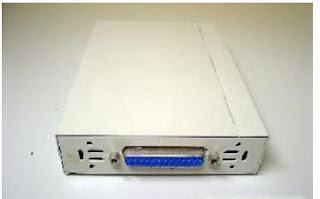
Figure 2: Parallel port on a router with print server feature.
|
Installation
So, all you will need to setup your network using a broadband router is the router, of course, which is really cheap these days (they rang from USD 35 to USD 50 depending on the brand and extra features), one pin-to-pin network cable for each computer you want to connect to the network (this cable can be bought already assembled and is also called UTP, Unshielded Twisted Pair; your should buy a cable called Cat 5, which is usually blue or gray) and, of course, an available broadband connection (cable or ADSL).
Figure 3: Typical network cable.
Your broadband modem (cable or ADSL) will be connected to a port labeled ”WAN“ on the router, while all computers will be connected to other available ports, usually labeled ”LAN“. If you need more ports, you will need to buy an external switch and connect it to one of the available ports. You need to connect the other end of the cables to the LAN card located on the computers, of course. Nowadays all computers have integrated LAN port on the motherboard. If you have an older computer without this feature, you will need to buy and install a network card (also called 10/100 Network Card or NIC, Network Interface Card) on it.
Figure 4: How to connect your broadband router.
The uplink button must be disabled. This button is used when you use a different kind of cable, called cross-over, which is not the case. The reset button can be useful in some repair situations. As you can see, you need to connect your router to its power supply.
Figure 5: Example of a LAN port on a desktop.
Figure 6: Example of a LAN port on a laptop.
You don’t need to worry about installing the network cable on the wrong jack: the network plug (which is called RJ-45) only fits the network card.
After hooking everything, turn on your broadband modem, turn on your router and turn on one of the computers to access the router configuration panel. You will need to do some basic configuration – for example, choosing the type of connection you have, cable or ADSL. |
|
|
Configuring The Computers
All computers on your network must be configured to obtain their network configurations automatically from a DHCP server (which is your router). This is the default Windows configuration, but is always good to check if your computers are correctly configured.
To configure your computers, click on Start, Settings, Network Connections, the screen shown in Figure 7 will appear. Double click the network card that is connected to the router.
Figure 7: Network connections.
On the screen that will show up, click on Properties. The screen shown in Figure 9 will appear. Double click on Internet Protocol (TCP/IP) and the screen shown in Figure 10 will show up.
Figure 8: Status of the network connection. You should click on Properties.
Figure 9: Network card properties.
Figure 10: TCP/IP configuration.
On this screen you should select ”Obtain an IP address automatically“ and ”Obtain DNS server address automatically“. This will make your computer to ask your router which configurations it should use. Don’t forget to click on Ok if you needed to change anything on this screen.
Now that your computers are correctly configured, you should configure your router. |
Router Configuration – The Basics
The first thing you need to know is the configuration panel IP address for your router. This information is written on its manual. It is usually 192.168.0.1, 192.168.1.1 or 10.0.0.1. So, launch your web browser and open http://[IP address here]. The router used on our examples uses the address 192.168.1.1, so we would need to open http://192.168.1.1. Of course you need to change that according to the IP address used by your router.
All configuration options vary according to the router model. So, maybe you won’t find the options we are describing here with the exact same name, but they will exist, since we are talking only about basic options.
Usually the very first configuration page asks you to choose between a quick setup and an advanced setup. Even though quick setup is the best for setting up your network in less than five minutes, the very first configuration you should do is inside advanced setup: setting up a password for your router.
Figure 11: First screen on the router configuration panel.
As you can see, your router configuration panel is accessible from any computer on your network. Even though this may not be an issue on very small networks, the router control panel can usually be accessed from any computer located on the Internet. For example, let’s say that your real IP address is 69.69.69.69 (the IP address that your ISP assigned to your broadband modem). Any computer on the Internet can access your router configuration panel by simply opening a web browser and pointing it to http://69.69.69.69. This feature can be disabled on some routers. However, it is a very interesting feature, as you can repair or reconfigure your office or home network from any computer in the world. So it is up to you to enable or disable this feature, depending if you are going to use it or not.
Figure 12: Setting up the admin password.
On our router, this configuration is done at Advanced Setup, System, Administrator Settings. At this screen you can both setup the admin password and choose to enable remote management. On our router remote management is disabled, we could enable it and choose to enable it just for one specific IP address (for instance, the IP address from our home computer), so other computers won’t be able to access the router control panel remotely. Also, you can specify an access port. Using the router in Figure 12, we couldn’t access it by using http://69.69.69.69, we would need to open it as http://69.69.69.69:8080. This is a simple way of preventing wannabe hackers to open your router configuration panel from their computer (serious hackers know that 8080 is a common used port and can also run a port scan to see which ports are open on your router).
Of course you must click on Apply to make the changes effective.
So, after this very important security explanation, let’s go to the basic router configuration. |
|
|
Router Configuration – Basic Setup
Basically, all you need to do is to choose the connection type you have: cable, ADSL with dynamic IP (i.e., the IP address given by your ISP changes from time to time – which is the most common type), ADSL with static IP (i.e., the IP address given by your ISP doesn’t change – usually available only if you requested it and usually it is more expensive) or VPN (Virtual Private Network – usually used on corporate networks).
Just go back to the basic setup and navigate through its screens. On our router we had only to configure the time zone on the first screen, the modem type on the second screen and just keep clicking on Next and accepted all default configurations, if your have a cable or ADSL connection (if you use a VPN connection, then you need to enter some information). We hit on Finish on the last screen and that’s all we needed to do to make our network work.
Figure 13: Basic setup, first screen (time zone configuration).
Figure 14: Basic setup, second screen (connection type).
Figure 15: Basic setup, third screen (WAN settings, just leave the default values).
Figure 16: Basic setup, fourth screen (DNS settings, just leave the default values); click on Finish.
After clicking on Finish, try to access the Internet from your computer and from all other computers located on your network. If it doesn’t work, double-check all configuration steps. If it still doesn’t work, you will need to call you ISP support service and explain them that you have just installed a router and need them to ”release your IP address“.
In case you are wonder what that means: when you use a broadband service, usually the public IP address (ex: 69.69.69.69) is assigned to the computer connected to the broadband modem. So the ISP locks the given IP address to the MAC address connected to the modem. MAC address is a serial number written on the network card. So, when you disconnect your modem from your computer and connect it to your router, the connection may be blocked because the ISP network is expecting the MAC address of your desktop, not the MAC address of your router, which is different. ”Release the IP“ means that the ISP will re-scan for the new MAC address connected to the modem. |
Router Configuration – Advanced Setup
You probably won’t need to change anything at the router’s advanced setup. However, if you want to limit Internet access from certain computers, that’s the place to go. Also, if you play online games or use a P2P application, you should open the ports used by your software here, or the router will block your program from connecting the Internet. On advance setup you will also find security-specific options, which we will be talking about in the next page.
On our router, we can limit Internet access based on time on Advanced Setup, Firewall, Client Filtering. For blocking all computers from browsing during business hours, for instance, we could block all IP addresses from 192.168.1.1 to 192.168.255.255, port 80 (which means www) and then configure weekdays and times to allow or block access. Since the configuration allows you to specify a port number, you can also block e-mail (ports 25 and 110) or even instant messengers like MSN Messenger (port 1863). A good place to get port information for several applications is http://www.chebucto.ns.ca/~rakerman/port-table.html.
Figure 17: Blocking access based on weekday and hour.
We could even block certain computers from having any kind of Internet access, on Firewall, MAC control. There you can enter the MAC address from the computer you want to block from having any kind of Internet access. This computer will continue to have access to other resources located inside your network, like shared folders and printers.
Figure 18: Blocking access based on MAC address.
If you have special software that uses non-standard ports, you should open the ports on the router, or your program won’t be able to access the Internet. This is true for P2P programs and games. You should look for the ports the program uses on its manual and open its ports at NAT, Special Application. On our example in Figure 19, our router has Overnet (a P2P software) ports open. Learn more about this reading How To Make P2P Programs to Work on Networks Using a Broadband Router.
Figure 19: Opening non-standard ports.
|
|
|
Security
In these days of a highly connected world, security is a real issue. We already talked about the basic security configuration you should do on your router – setting up an access password and eventually disabling remote management.
As we mentioned, your router works as a firewall as well. It will block any incoming connection to non-standard ports. That’s why we need to open non-standard ports used by certain programs. The router default configuration is good for preventing people from playing online games, for example.
One interesting option all routers have is to block any ping request to your public IP address. Ping is used to see if there is any machine installed on a given IP address, and this technique is used to find computers on a network. If you disable pinging, people trying to find computers on the Internet using pinging won’t find yours. So, we recommend you to go ahead and check the ”Discard PING from WAN side“ on Firewall, Block WAN Ping. However, if you play online games, pinging is used to check the delay between you and the game server. In this case is better to leave pinging enabled.
Figure 20: Disabling pinging.
Another important feature available on all routers is firmware upgrade. You should go to the router manufacturer website and download the latest firmware upgrade for your router and upgrade it. On our router this could be access at System, Firmware Upgrade. This will ensure that your router is protected from any security flaws the manufacturer has discovered so far.
All computers from your network should be safe by now from ”the outside world“. Of course we are talking about hack attacks using direct IP techniques; you still need to use antivirus and antispyware software on your computers. If you install a Trojan Horse on your computer hackers may access it even though there is a firewall between your computer and the hacker computer.
You may want to read two tutorials we have already posted regarding security: Testing Your Computer’s Security and Protecting Your Computer Against Invasions.
Now that your network is set up and secure, you can go ahead and share folders and printers between your computers without being afraid of someone on the Internet having access to your files. Read How to Share Folders and Printers on Your Network to learn how to share files and printers on your network, as it is the sequel of the present tutorial.
Source "HARDWARE secrets"
Click here to download it as a PDF file. |


No comments:
Post a Comment