If you built your own network using a broadband router, the router will automatically prevent any P2P file sharing program (eMule, Shareaza, etc) from working correctly on your network: it will either get a “low ID” or will be shown as “firewalled”. As a consequence you will get lower transfer rates and also won’t be able to initiate file downloading from users that are also “firewalled”. In this tutorial we will teach you how to configure your router to correctly allow P2P file sharing programs to work.
This problem happens because P2P programs use non-standard ports to work. Since broadband routers work as a firewall, they block all connections using non-standard ports. So in theory it would be just a matter of “opening” the ports that your P2P program uses on your broadband router control panel to solve this issue. However, it isn’t that simple. Usually by simply “opening” ports on your firewall programs have access to servers on the Internet using these ports, but it doesn’t allow other computers on the Internet to have access to your PC. In other words, while the firewall will allow outgoing connections, it will still operational, blocking incoming connections. Keep in mind that when using P2P programs your computer will act as a server, delivering files (and parts of incomplete files) to other users.
On this tutorial we will use eMule as our example. The basic idea shown on this tutorial is exactly the same for other programs; the only different thing will be the exact location of the options we need to change on the program. You will be able to adapt this tutorial to other programs very easily.
Let’s first take a look at the problem. After downloading and installing eMule on our PC we hit “Connect” and we got a “low ID” status, as shown in Figure 1 (follow the red arrow). The correct would be getting a “high ID” status (for security reasons we removed our IP address from this screenshot).

Figure 1: Getting a low ID with eMule.

Figure 2: Connection test failed.
The first thing we should do is to reconfigure eMule to use a different set of TCP/IP ports. On the eMule version we installed it was using ports 19034 for TCP protocol and 17157 for UDP protocol. You need to change that to 4660 for TCP protocol and 4670 for UDP protocol. This is done on Options, Connection. In Figure 3, you can see how our eMule was configured and then in Figure 4 you can see eMule correctly configured. Don’t forget to click on “Apply” after changing this configuration. Exit eMule.

Figure 3: Ports that our eMule version was using.

Figure 4: eMule correctly configured.
Now you need to configure Windows XP’s internal firewall.
Configuring Windows XP Firewall
Windows XP SP2 has an internal firewall that blocks P2P connections (if you don’t have SP2 installed you won’t have Windows Firewall installed). So we must configure Windows XP in order to “open” the ports used. If you have another firewall program installed such as ZoneAlarm or Norton Personal Firewall, you will need to make this procedure on your firewall program. After running your P2P program for the first time you probably unblocked it on Windows Firewall (by clicking on Unblock on the screen shown in Figure 5) but this isn’t enough.
Figure 5: Windows asks you if you want to unblock your P2P program when you run it for the first time.

Figure 6: Configuring Windows Firewall.

Figure 7: Adding the TCP port used by eMule.

Figure 8: Adding the UDP port used by eMule.

Figure 9: Windows Firewall exceptions.

Figure 10: Windows Firewall.

Figure 11: Windows Firewall advanced settings.
If you don’t know the name of your computer, go to Control Panel, System, Computer Name tab. It will be listed there. If you prefer to use the IP address of your PC and don’t know it, click on Start, Run, Cmd and then type Ipconfig and hit Enter. This command will list the IP address your computer is using. We know that the IP address of your computer can change over time, but later we will need to configure our router to always assign the same IP address to our computer, so actually this won’t be really a problem.

Figure 12: Adding the TCP port used by eMule.

Figure 13: Adding the UDP port used by eMule.

Figure 14: The configurations to use eMule are now in use.
Click Ok and you are done with Windows Firewall configuration.
Our next step is configuring our router.
Configuring The Router
The exact options names and locations for your router configuration will vary depending on the router brand and model. In our examples we are using a D-Link DI-524 router and we think it is not so hard finding out how the options we will show are named on your particular case.The first thing you will have to do is obviously enter the router control panel. If you don’t know how to do that, read how to build a network using a broadband router to learn how this is done.
There you need to look for an option called “Virtual Server” or similar. On our router this option was the first found under “Advanced”, see Figure 15.

Figure 15: Virtual server option.

Figure 16: Opening the TCP port used by eMule.
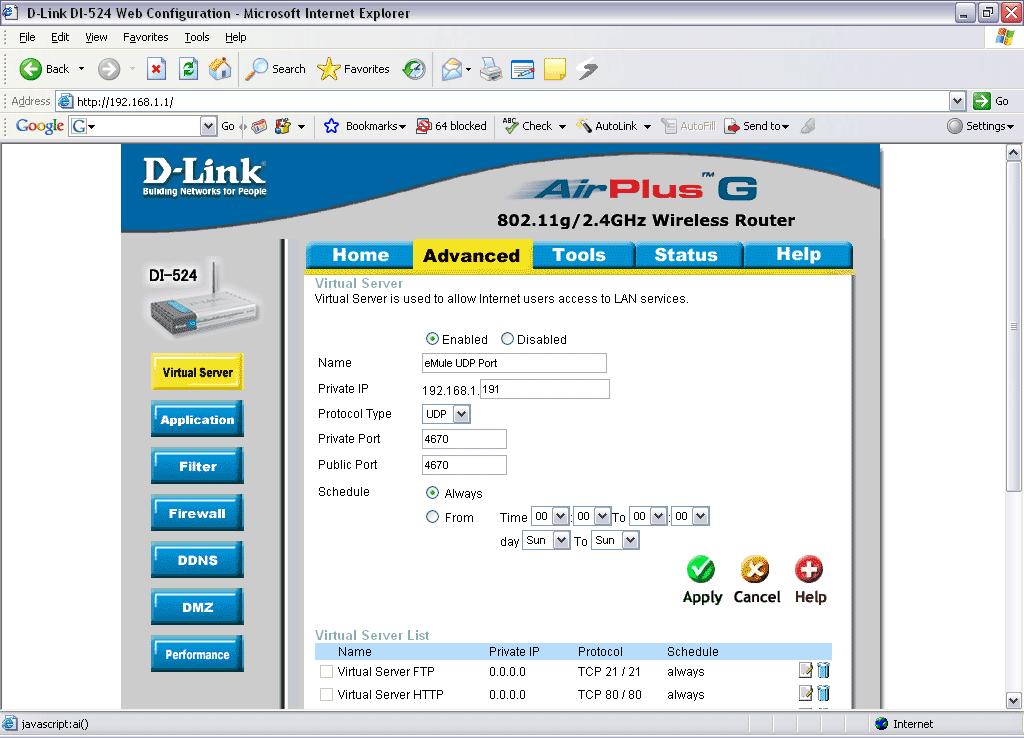
Figure 17: Opening the UDP port used by eMule.

Figure 18: eMule TCP and UDP ports opened on our router.
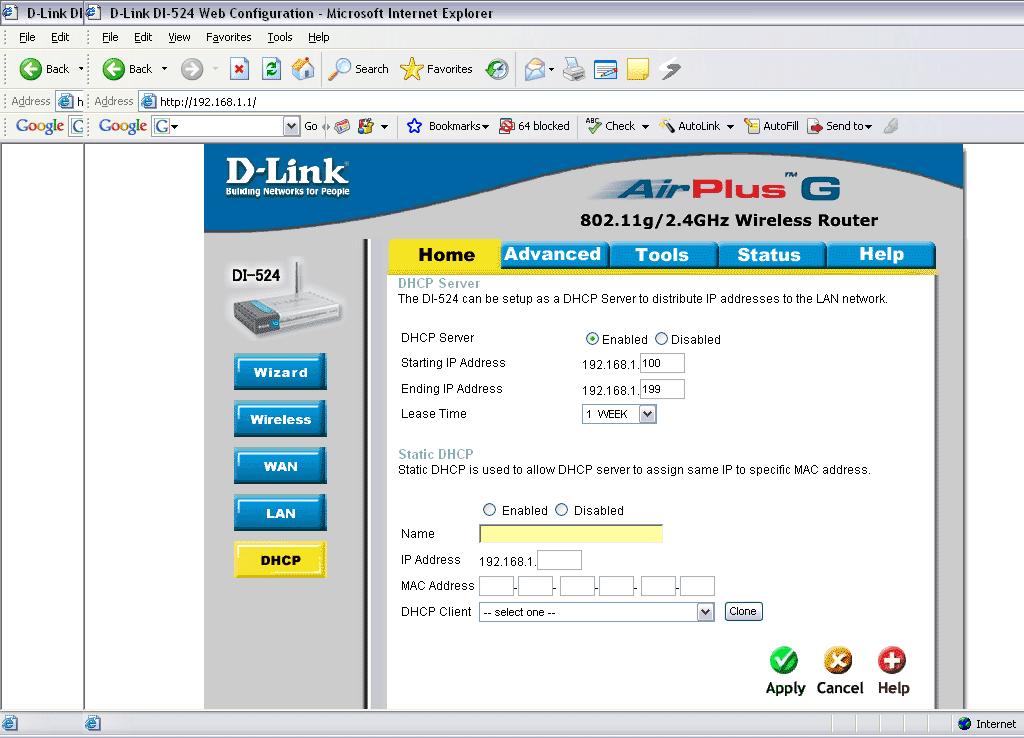
Figure 19: DHCP Configuration.

Figure 20: Configuring our router to always assign the same IP address to our PC.
Now it is time to check if everything was correctly configured. Enter your P2P program, click on Connect and now you will get a high ID or “open” status (instead of “firewalled”), follow the red arrow in Figure 21. On eMule we can run again its internal test (Option, Connection,


Source "HARDWARE secrets"
Click here to download this as a PDF file.


No comments:
Post a Comment